RPG Studio
RPG Studio is the visual editor built into the RPGScript VS Code extension. It lets you build and edit a system with point-and-click block editors instead of writing RPGScript by hand — formulas, views, mechanics, macros, and all of the system's metadata.
You don't have to choose between the Studio and the source files. The Studio edits the very same .rpgs and .rpg.json files in your system folder, and it preserves your comments and formatting on save. You can edit a stat visually one minute, open the raw file the next, and the two stay in sync. If you already know RPGScript, the Studio is a faster way to do common edits; if you don't, it's a way to build a complete system without ever learning the language.
If terms like "stat", "view", "mechanic", and "system" are new to you, read System Creation first — it explains the concepts the Studio lets you edit. This page assumes you know what you want to build and shows you how to do it visually.
Before you start
The Studio ships inside the RPGScript VS Code extension, so the setup is the same:
- Install the extension. Follow the steps in Using the Dev Tool — everything you need is included, no extra setup.
- Point it at your systems folder. In VS Code settings (
Cmd+,), searchrpgscriptand setrpgscript.devTool.systemsBasePathto the folder that contains your system directories (yoursystems/folder). - Open that folder in VS Code (
File → Open Folder…). The Studio reads your system from the workspace.
If you don't have a system yet, the easiest way to start is to fork the community systems repo and open it — you'll have a complete, working system to explore in the Studio immediately.
Opening the Studio
Click the RPG Companion icon in the VS Code Activity Bar (the vertical strip of icons on the far left). This opens the Studio tree view — your map of the whole system.
If your workspace contains more than one system, use RPG Companion: Select Active Studio System from the Command Palette (Cmd+Shift+P) to choose which one the Studio is showing. If the tree ever looks out of date after an external change, run RPG Companion: Refresh Studio Project Model.
Everything you double-click in the Studio tree opens as a normal editor tab. You can have several open at once, split them side by side, and close them like any other file.
The Studio tree (your navigator)
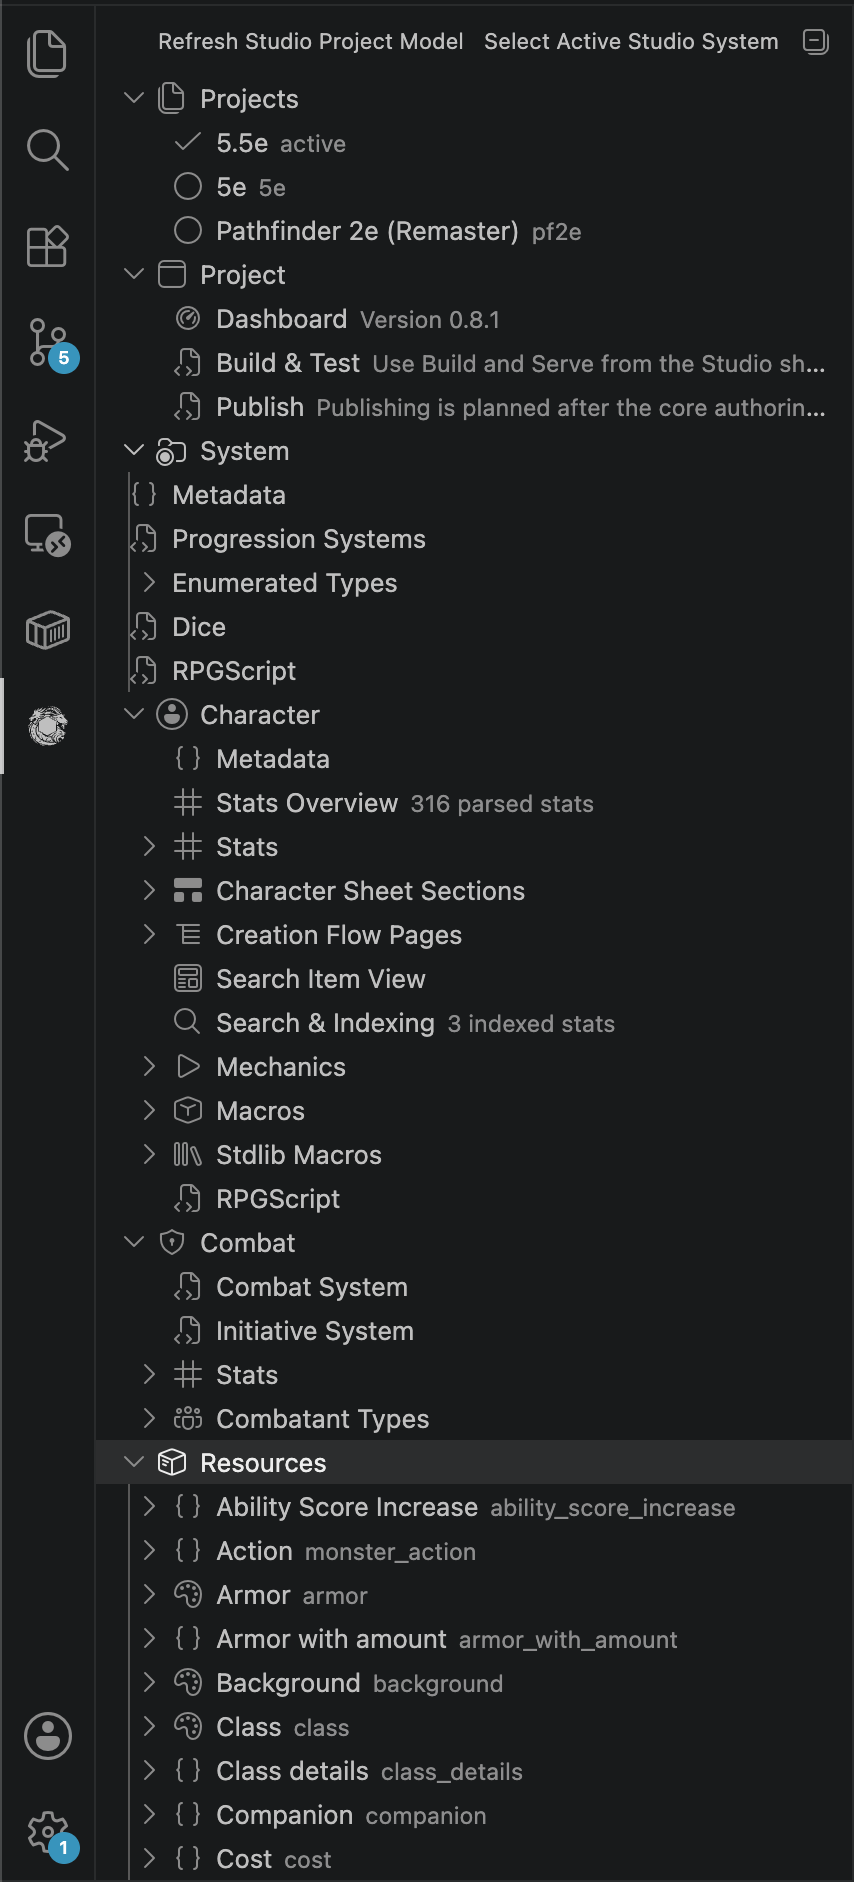
The tree on the left is how you reach every part of your system. The exact nodes depend on what your system defines, but the shape is consistent:
- Metadata — your system's name, version, currencies, and other top-level settings.
- Enumerated Types — your lists of fixed options (abilities, conditions, damage types, dice, …).
- Character — everything about the player character:
- Stats (organized into groups), Views, Mechanics, and Macros.
- Search & Indexing — which character stats are searchable.
- Progression — your levelling / point-buy progression.
- Combat — your combat and initiative systems, combat stats, and combatant types.
- Resources — each resource type (spells, monsters, items, …) with its own stats, views, mechanics, and search settings.
Most nodes do something on double-click (they open the matching editor) and offer more actions on right-click (create, rename, delete, Show in Navigator). Nodes that create something new — like + New Base Stat, + New View, or + New Macro — appear as action rows right in the tree.
Editing stats

Double-click any stat to open the Stats Builder. A stat's value is an expression, and the builder lets you assemble that expression from blocks ("chips") instead of typing a formula:
- Stat references — drop in another stat by name; the builder knows every stat in your system.
- Functions / components — add things like
max,sum,if, or any function from the schema; each shows its named arguments so you can fill the slots. - Literals — plain numbers, strings, and booleans.
- Lambdas — for list operations (
map,filter,reduce,sortBy, …), the builder gives you the loop variable in scope automatically. - Macros — start typing a macro name in any expression slot and it becomes a macro call with editable arguments.
To create a new stat, use + New Base Stat or + New Calc Stat in the Stats group. The Studio asks for the type — scalars (integer, decimal, string, bool, …), a resource<…> reference, or an array of any of those — and writes a valid stub for you to fill in.
A base stat holds a value the player edits directly. A calculated stat derives its value from a formula. The builder works the same for both — calculated stats just expect a non-trivial expression.
Required fields that are still empty (most importantly a stat's id) are flagged in red until you fill them, so a new stat tells you what it still needs.
Organizing stats into groups
Stats are grouped in the tree to keep things tidy. Right-click the Stats area to create a group, assign stats to it, rename, or delete it. Empty groups still show so you have somewhere to drop things.
Editing views
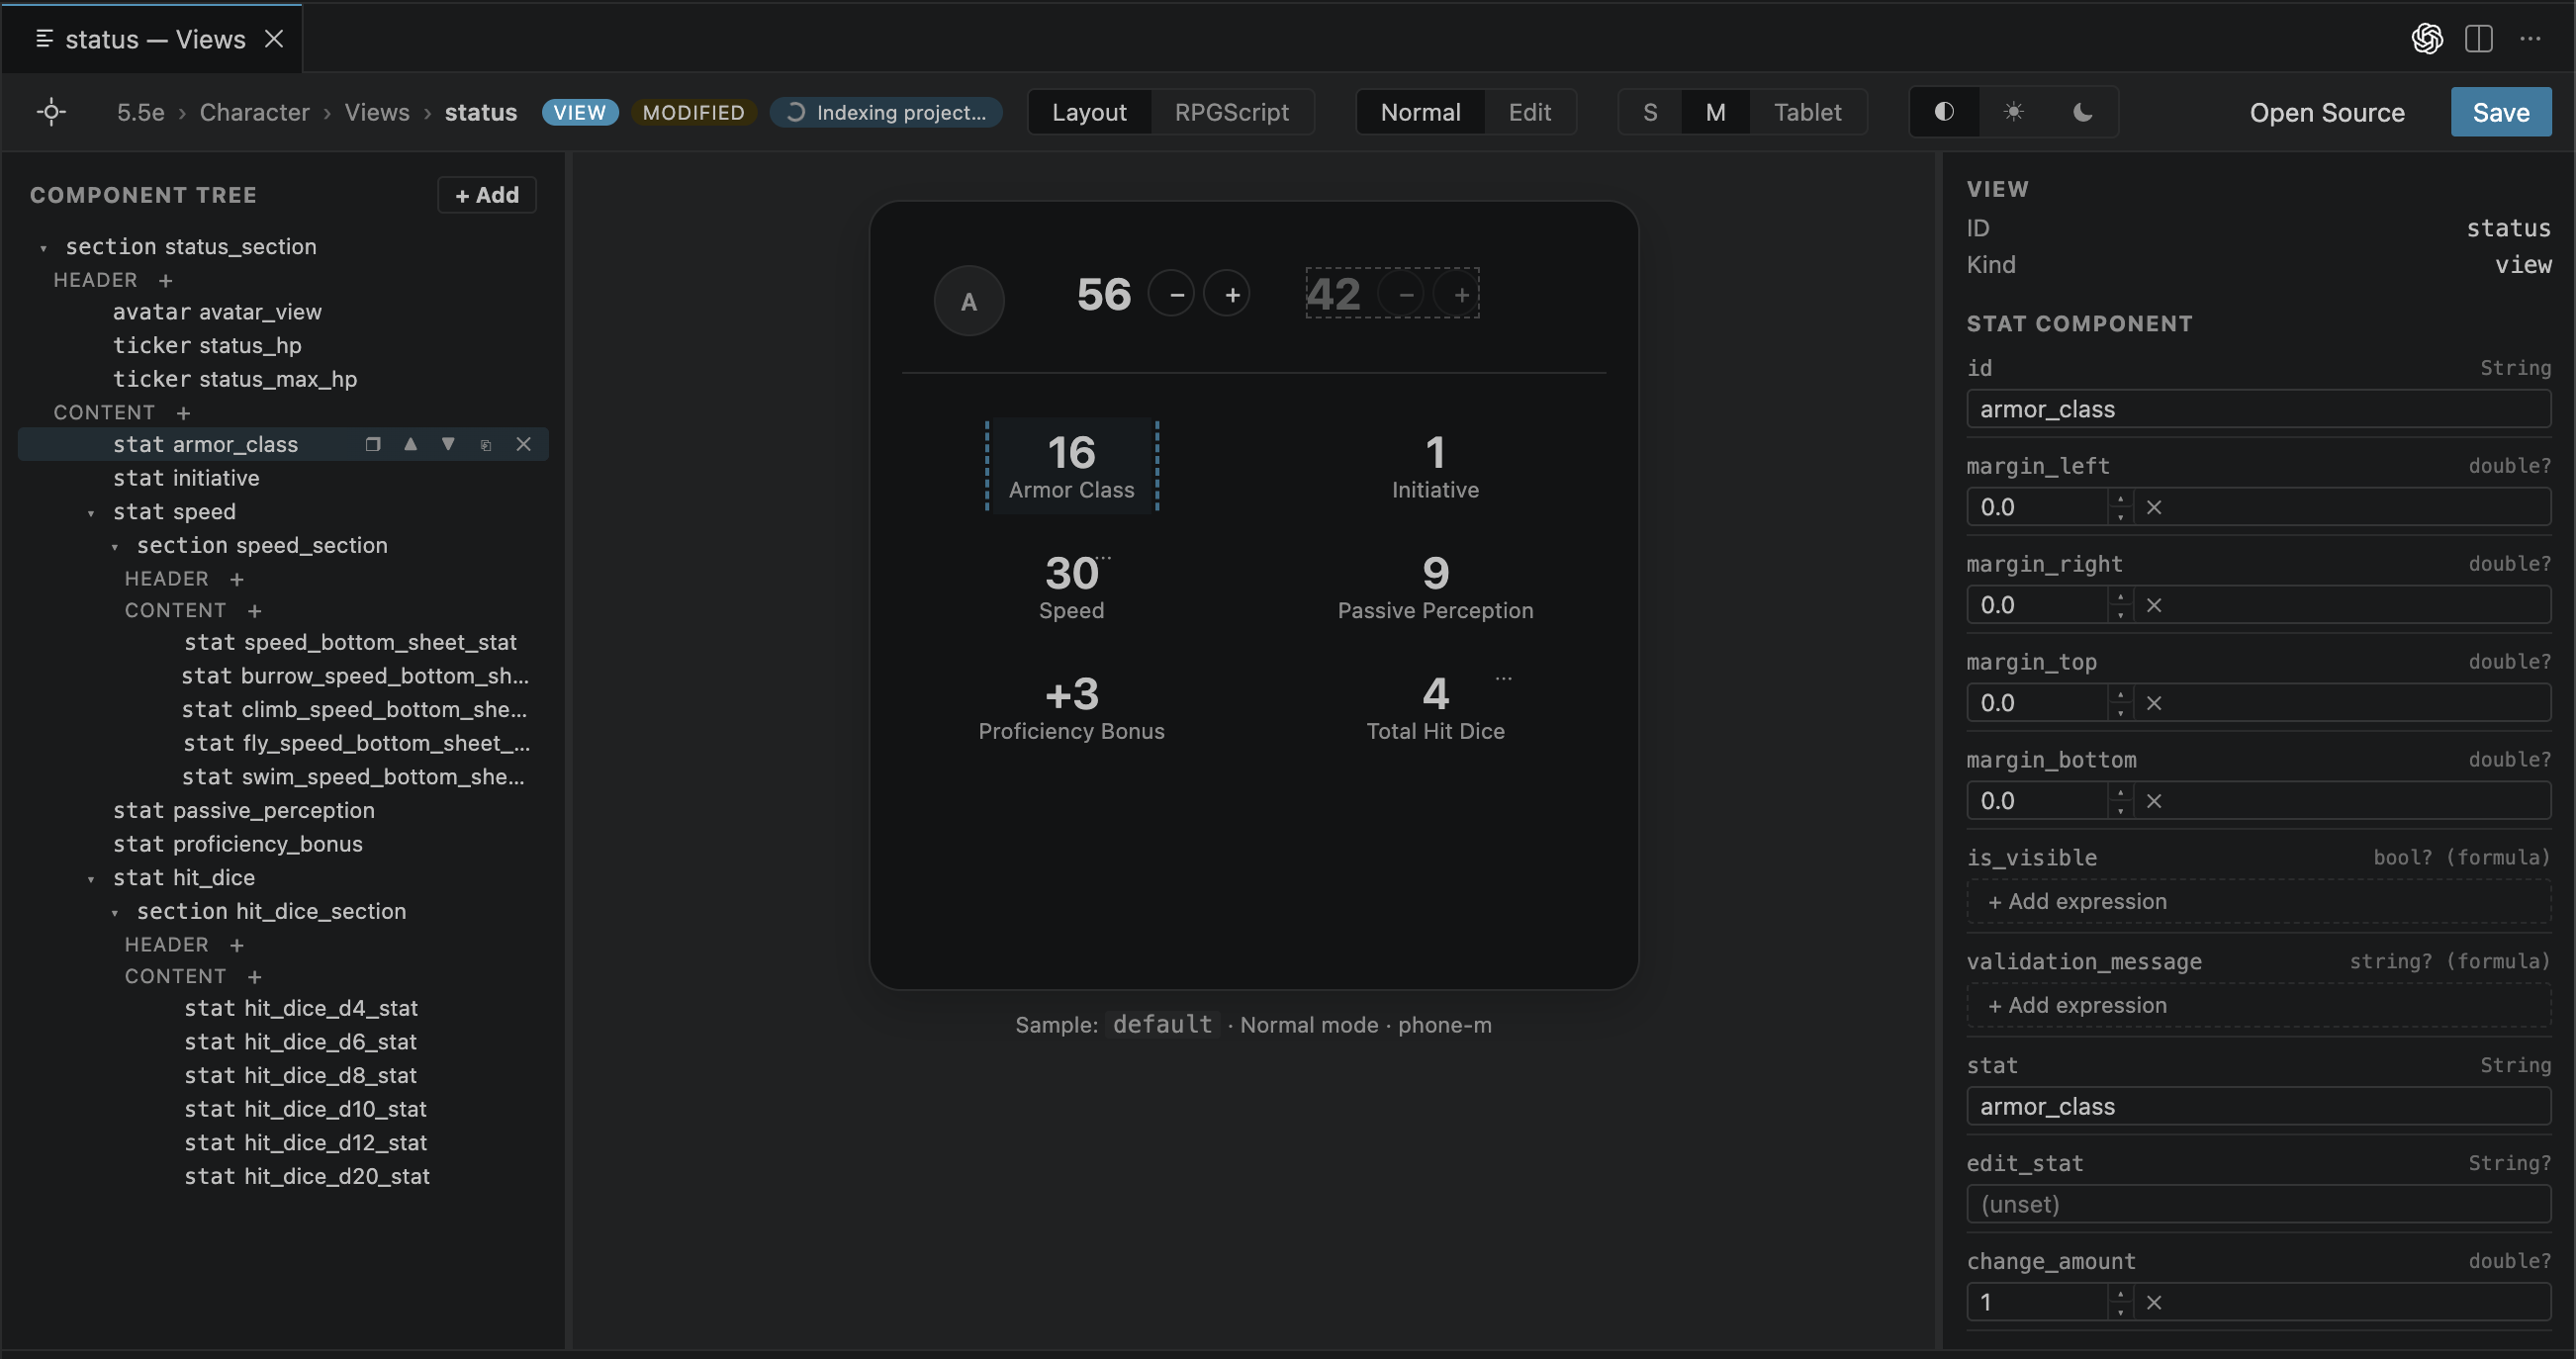
Double-click a view to open the view editor, which has three panes:
- Component Tree (left) — the nested structure of your view.
- Preview (middle) — a live render using sample data, with a toggle between normal and edit appearance.
- Inspector (right) — the properties of whatever component you've selected.
To add a component, press the + on a container and pick from the component palette (sections, composites, text, buttons, lists, resource displays, and so on). Containers with several slots — like a section's header and content — show each slot separately with its own + Add button, so you always know where a new component will land.
Two structural helpers are worth knowing:
- Wrap in container (the ❒ button on any row) puts the selected component inside a new section, composite, collapsible, etc. — handy for restructuring a view without deleting and rebuilding it.
- A brand-new view starts as an empty placeholder; the first component you add becomes the top-level view, so you're never locked into a wrapper you didn't want.
In the Inspector, simple properties are plain inputs, and any property that takes a formula opens the same expression builder used for stats. Each field shows its expected type (for example string (formula) or bool? (formula)) so you know what's valid.
Editing mechanics
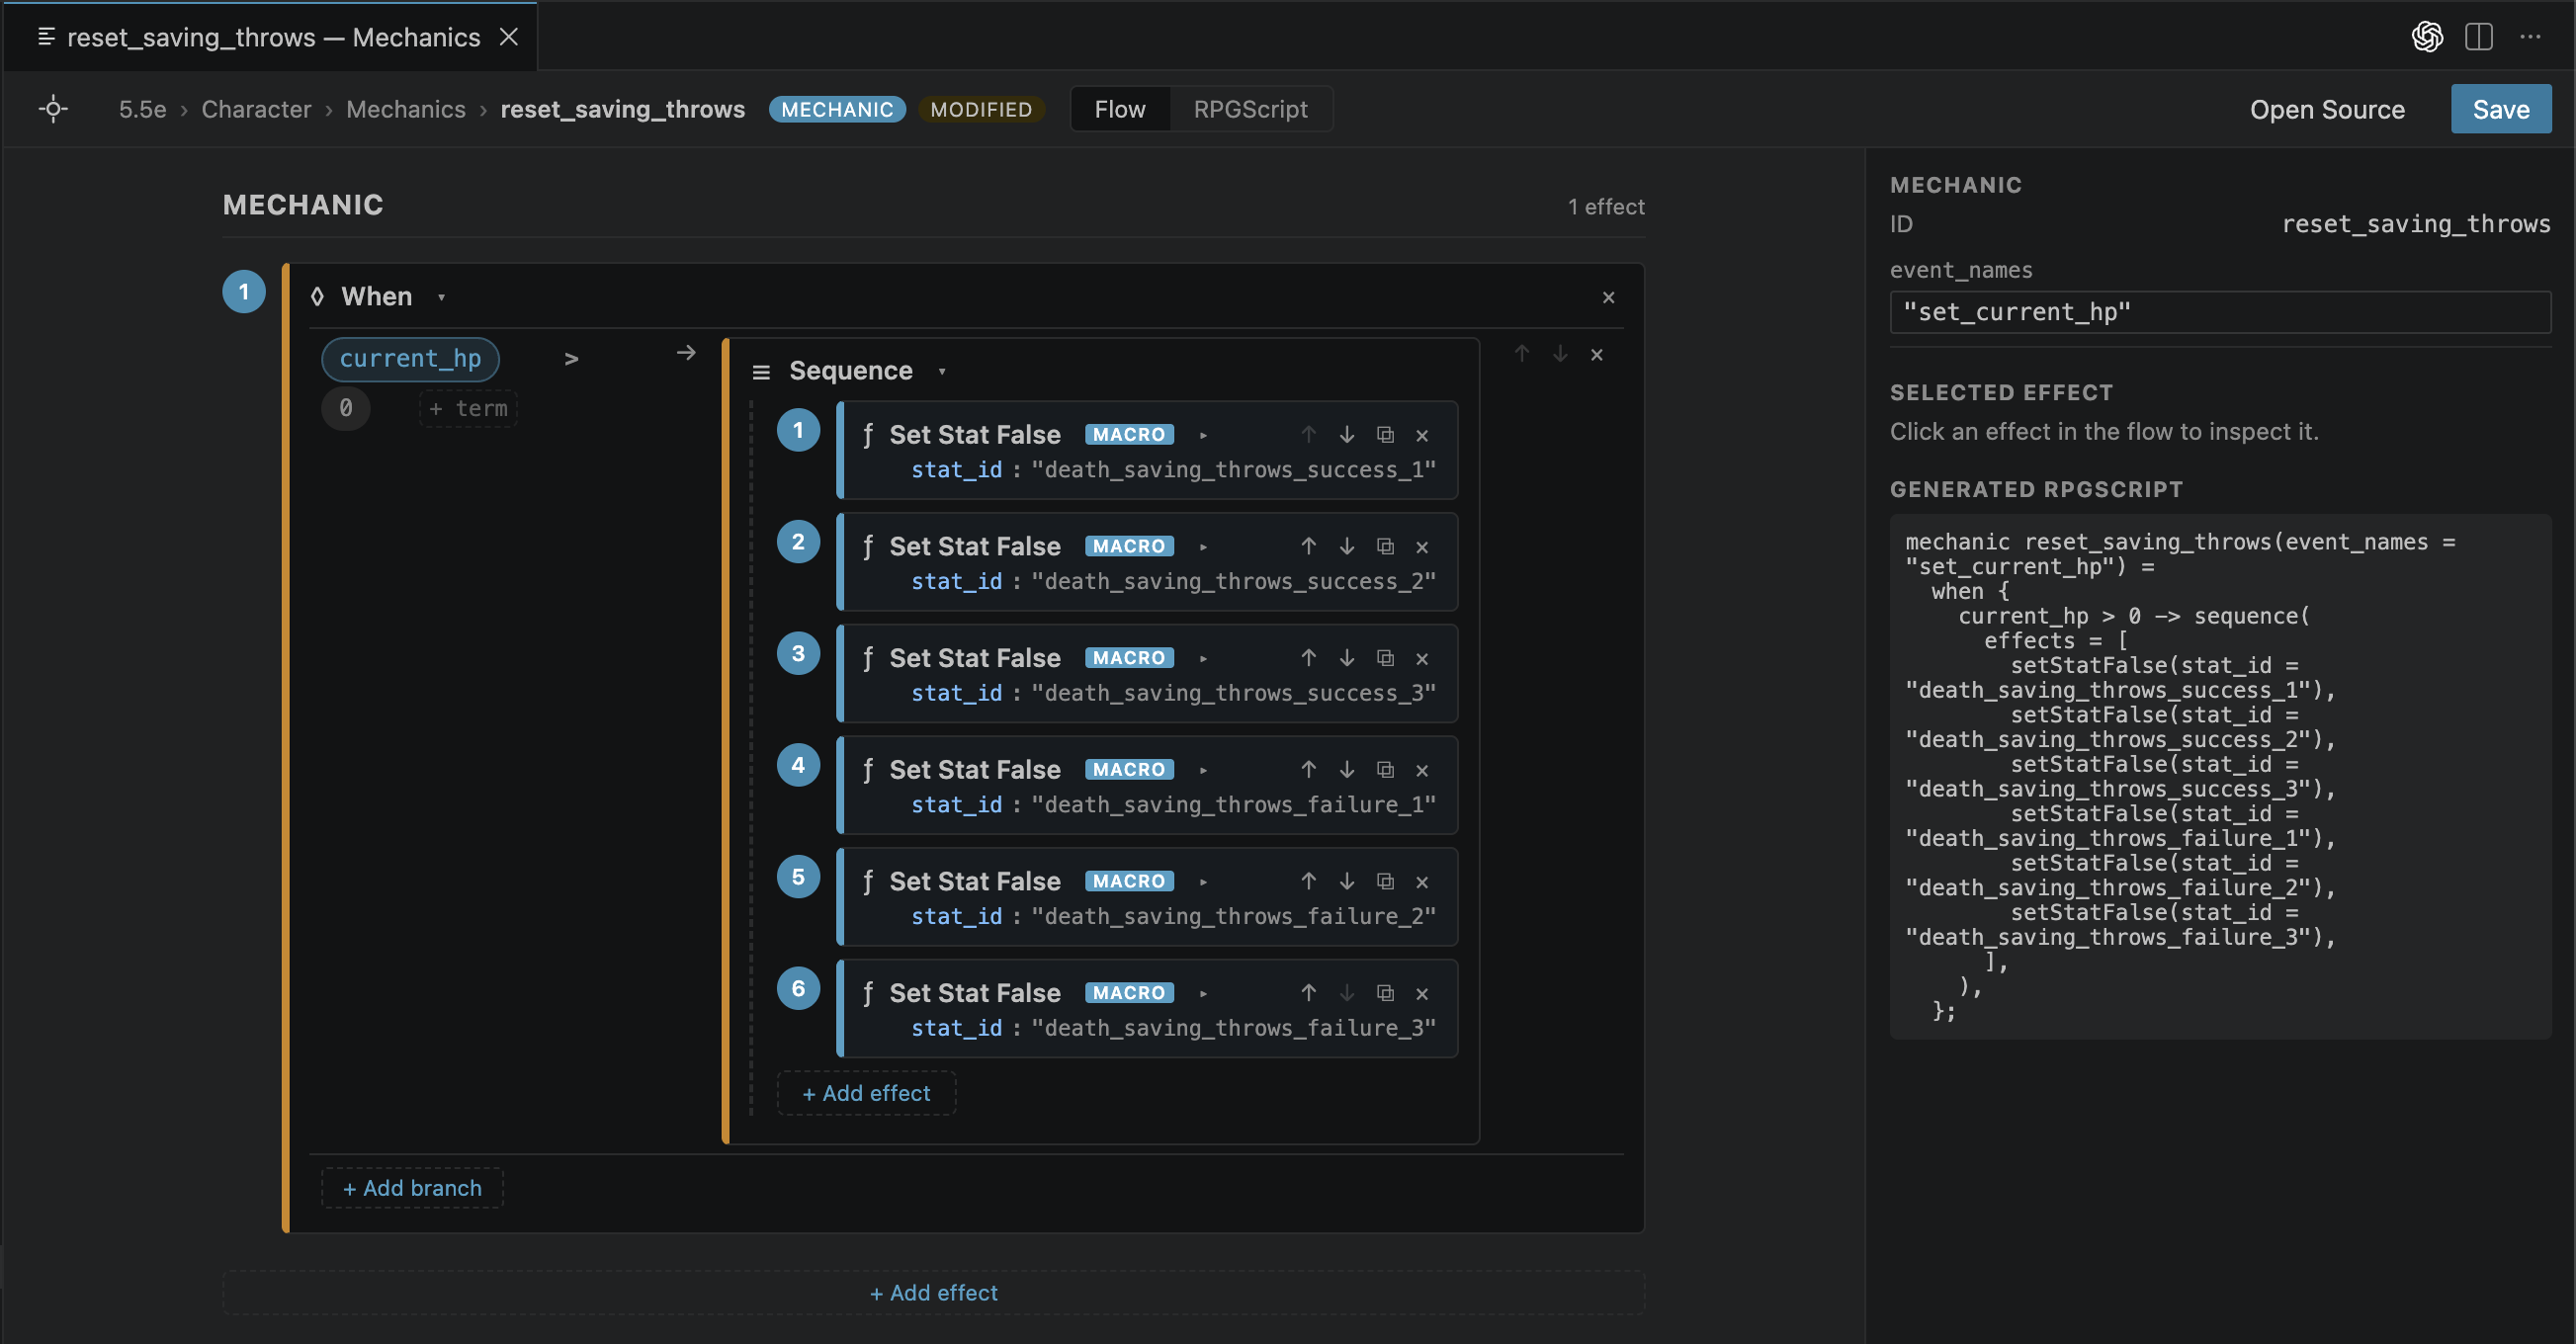
Double-click a mechanic to open the flow editor. A mechanic is a tree of effect blocks — "set this stat", "add to that stat", "show a message", and so on — and the editor lets you build that flow visually:
- Add an effect with the effect palette; remove any effect with its ×.
- When blocks (conditional branches) get the full expression builder for their condition, plus per-branch add/remove.
- The Inspector edits the selected effect's fields, including formula arguments via the expression builder.
- Macros that represent effects appear in the palette too, so you can reuse them like built-in effects.
Macros
Macros (define …) are reusable snippets — a named value, a shared piece of a view, or a common effect. In the Studio they behave like first-class building blocks:
- Create one with + New Macro (you choose its name and parameters).
- Edit it visually — a macro opens in whichever editor matches what it returns (Stats, Views, or Mechanics).
- Jump to a macro's definition by double-clicking it anywhere it's used — inside a formula, a view, or a mechanic.
- Use it by typing its name in any matching slot; the right macros are offered for each context (value macros in formulas, view macros in views, effect macros in mechanics).
There's always an Edit Source ↗ escape hatch if you'd rather see or tweak the raw RPGScript.
Metadata, enums, and the rest of the system
Beyond stats, views, and mechanics, the Studio has dedicated editors for the parts of a system that used to be hand-edited JSON:
- Metadata — name, abbreviation, version, minimum app version, live-session toggle, and currencies (with conversion rates between them).
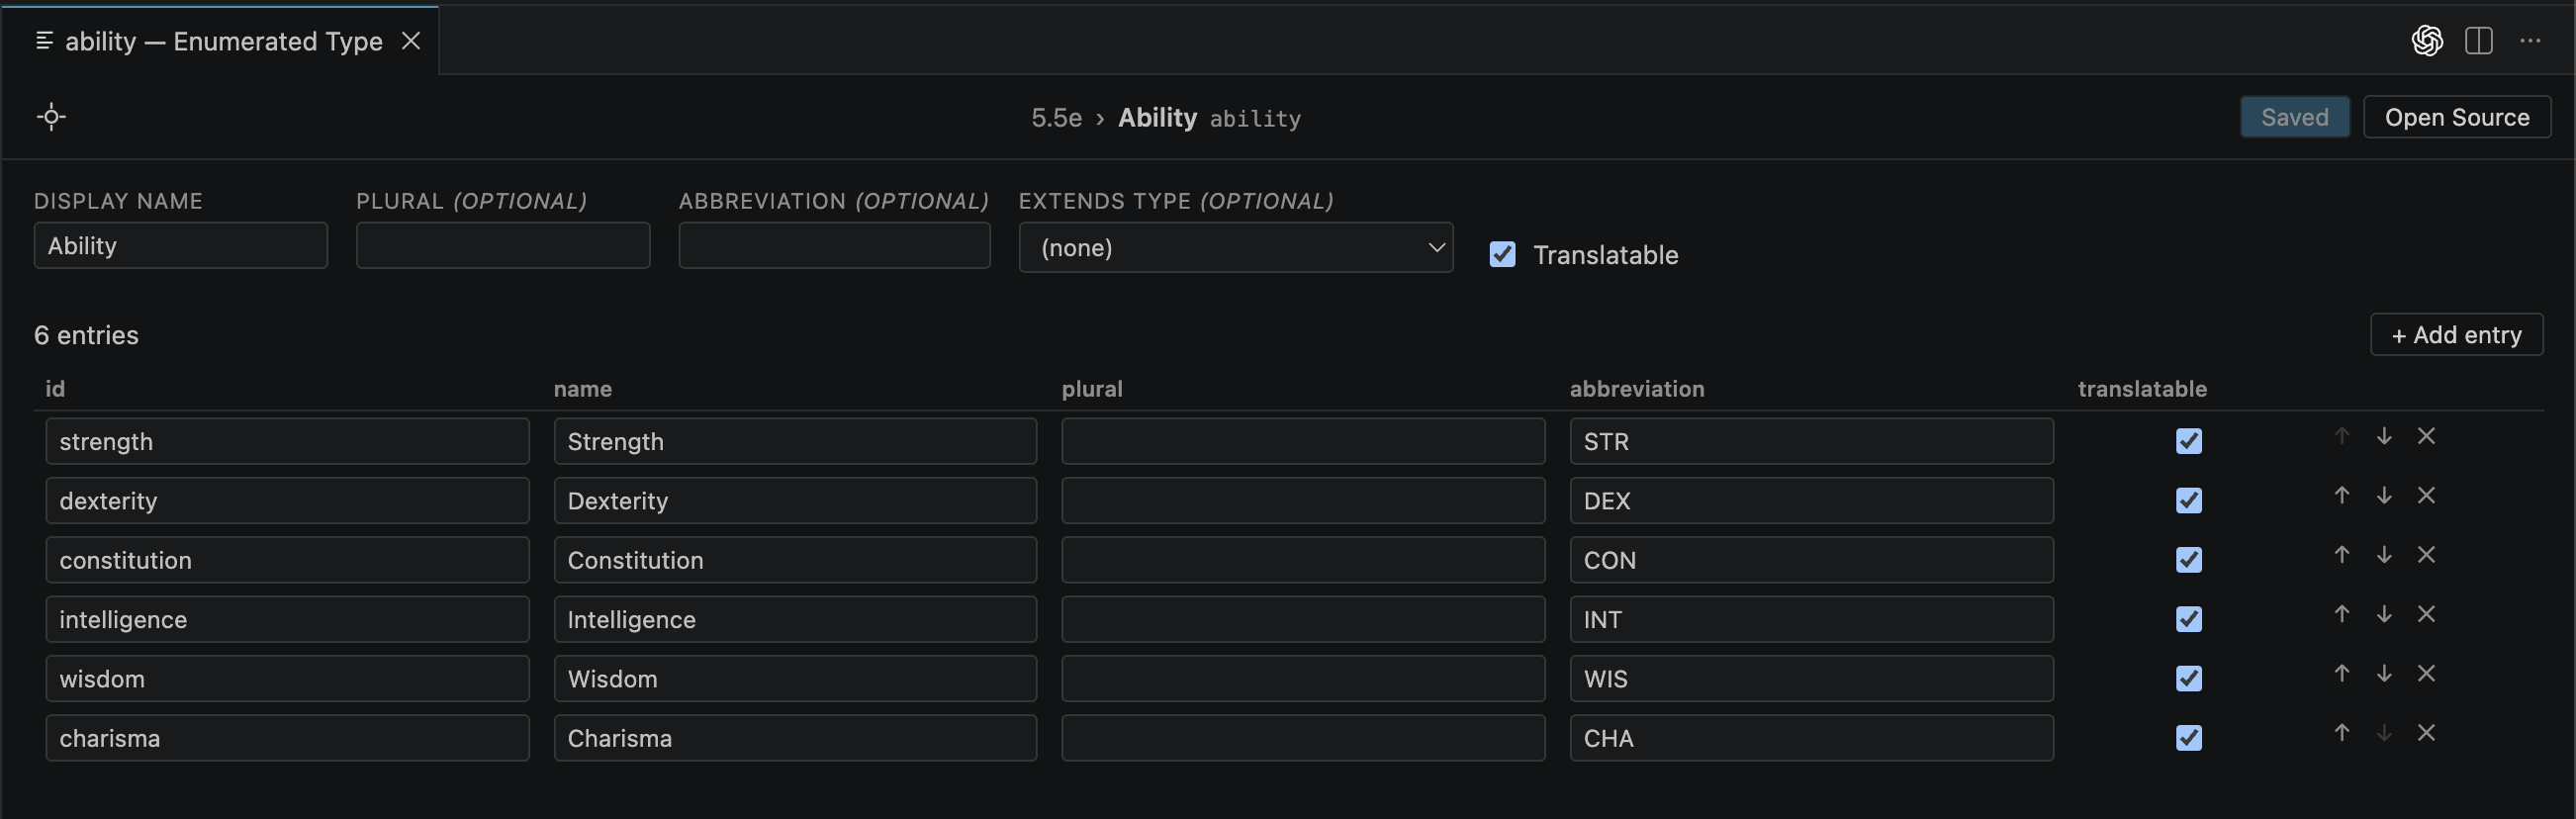
- Enumerated Types — create and delete types (abilities, conditions, damage types, dice, …) and edit each entry's id, name, plural, abbreviation, and translation flag. All optional fields are always editable, even when they're absent from the file.
- Search & Indexing — which stats are searchable, plus search filters and sort options for resources.
- Progression — your levelling or point-buy system, edited with the same formula, view, and effect builders used elsewhere (plus a table editor for experience thresholds).
- Combat — your combat and initiative systems, combat stats, and combatant types (their metadata and their card/header views).
These editors write standard .rpg.json / .rpgs files and round-trip them faithfully, so nothing the Studio doesn't understand is lost on save.
Saving, undo, and round-trip safety
- Saving writes back to the same source files in your system folder. Your comments and formatting are preserved — the Studio only changes what you actually edited.
- Undo / redo work with
Cmd/Ctrl+ZandCmd/Ctrl+Shift+Z. Note that when your cursor is inside a text field, the browser's own field-level undo wins; click out of the field first to undo structural changes (adding a block, reordering, etc.). - Show in Navigator (the locate icon in each editor's toolbar) highlights the thing you're editing back in the Studio tree, so you never lose your place.
- Open Source ↗ drops you into the raw
.rpgs/.rpg.jsonfile whenever you want to hand-edit — the language intelligence described in Using the Dev Tool is right there.
From the Studio to your app
The Studio changes your source files; it's the dev tool that turns those files into something the app can run. When you're ready to test:
- Build your system —
RPGScript: Build Systems (Dev Tool)(or enable Auto Build). - Serve it over Wi-Fi —
RPGScript: Start Output Server (Dev Tool). - Open the app in Developer Mode and refresh your systems.
See Using the Dev Tool for the full build/serve/publish workflow, and Hosting a System when you're ready to share it.
What's next?
- New to the concepts? Start with System Creation.
- Want to understand the language under the blocks? See RPG Script.
- Ready to build and ship? Head to Using the Dev Tool.